Installing a ceiling fan can significantly enhance your home’s comfort, improve air circulation, and even help reduce energy costs. The allure of a weekend DIY project is strong, promising a cooler home and a sense of accomplishment. However, the seemingly straightforward task of ceiling fan installation is often fraught with common pitfalls that can lead to anything from annoying wobbles and noise to severe safety hazards like electrical fires or a falling fan. This guide will walk you through the essential aspects of ceiling fans and, more importantly, highlight the crucial mistakes many DIY enthusiasts make, ensuring you approach your project with confidence and safety.
What is a Ceiling Fan? An Overview for the DIY Enthusiast
A ceiling fan is an electromechanical device suspended from the ceiling of a room, designed to circulate air. Unlike air conditioners that cool air, ceiling fans create a wind-chill effect, making you feel cooler. They consist of a motor, blades, a mounting system, and often a lighting kit.
Historically, ceiling fans have evolved from simple belt-driven mechanisms in the late 19th century to the smart, energy-efficient models we see today. While the market boasts numerous brands, for a DIYer, understanding the fundamental components and their proper handling is far more critical than brand names. The core elements remain consistent: a sturdy mounting bracket, a reliable motor to turn the blades, and blades designed to move air effectively.
Classifying Ceiling Fans by Function and Design Considerations for DIY
Understanding different ceiling fan types is crucial before installation, as each can present unique DIY challenges.
Ceiling Fans with Lights
These fans combine illumination with air circulation, offering a dual-purpose fixture.
- Pros: Space-saving, convenient, integrated design.
- Cons: More complex wiring (fan motor wires, light kit wires), potentially heavier, requiring a robust electrical box.
- DIY Choice: Requires careful attention to electrical connections for both fan and light functions.
|
Our Picks for the Best Ceiling fan in 2026
As an Amazon Associate I earn from qualifying purchases.
|
||
| Num | Product | Action |
|---|---|---|
| 1 | ZMISHIBO 52 Inch Ceiling Fan with Light, App&Remote Control, Flush Mount Low Profile, Dimmable 20W LED Light, Quiet Reversible Motor for Bedroom, Living Room, Apartment, Black |

|
| 2 | Fanbulous 52 Inch Ceiling Fans with Lights and Remote, Stepless Color Temperature Change & Dimmable 20W LED Ceiling Fan, 6 Speeds Reversible Quiet DC Motor for Bedroom, Living Room, Apartment, Black |
|
| 3 | Ceiling Fans with Lights, 42 Inch Ceiling Fan with Light And Remote, 3CCT Flush Moun Low Profile Ceiling Fans, 6 Speed Noiseless LED Ceiling Fan, Black Ceilings Fan with Remote for Bedroom Living Room |
|
| 4 | Ceiling Fans with Lights, 52 Inch Modern Ceiling Fans with Lights and Remote Control, DC Reversible Motor, Noiseless, 3CCT, Ceiling Fan for Bedroom, Living Room, Apartment Indoor/Outdoor Use |
|
| 5 | Passky Ceiling Fans with Lights, 52 inch Sleek Ceiling Fan with Light and Remote Control, 3CCT, Dimmable, Reversible, Noiseless, Black Ceiling Fan for Bedroom, Living Room |
|
| 6 | Asyko 46" Low Profile Ceiling Fan with Light and Remote Control,Black Modern Flush Mount Ceiling Fan with Lights for Bedroom, Reversible, Dimmable, Noiseless |
|
| 7 | ZMISHIBO Ceiling Fans with Lights and Remote, 19.7'' Low Profile Ceiling Fan, 3000-6000K Dimmable Modern Flush Mount LED Fan Light, 6 Wind Speeds, Black Fandelier Ceiling Fans for Bedroom |
|
| 8 | Ceiling Fans with Lights - 42 Inch Low Profile Ceiling Fan with Light and Remote, Reversible DC Motors, 3CCT Dimmable Timer Noiseless, Black Flush Mount Ceiling Fan for Bedroom/Living Room |
|
| 9 | Amico Ceiling Fans with Lights, 42 inch Low Profile Ceiling fan with Light and Remote Control, Flush Mount, Reversible, 3CCT, Dimmable, Noiseless, Black Ceiling Fan for Bedroom, Indoor/Outdoor Use |
|
| 10 | addlon Ceiling Fans with Lights, 42 Inch Low Profile Ceiling Fan with Light and Remote Control, Flush Mount, Reversible, 3CCT, Dimmable, Quiet, Black Small Ceiling Fan for Bedroom Indoor/Outdoor Use |
|
Ceiling Fans without Lights
These are simpler in design and often lighter, focusing solely on air movement.
- Pros: Simpler wiring (usually just for the fan motor), lighter weight, less expensive.
- Cons: No integrated light source, requiring additional lighting fixtures.
- DIY Choice: Easier wiring might appeal to beginners, but structural support and balancing remain vital.
Decorative Ceiling Fans
Designed primarily for aesthetic appeal, these fans often feature unique blade materials, intricate housings, and specialized finishes.
- Pros: Enhances room decor, wide range of styles.
- Cons: Can be heavier due to ornate materials, intricate assembly, potentially higher cost.
- DIY Choice: Pay extra attention to the specific assembly instructions and ensure the ceiling support can handle the fan’s weight.
Industrial Ceiling Fans
These heavy-duty fans are designed for large spaces like warehouses, garages, or large commercial areas, prioritizing powerful airflow over aesthetics.
- Pros: High CFM (cubic feet per minute) output, durable construction.
- Cons: Very large, heavy, often require specialized mounting hardware and electrical circuits.
- DIY Choice: Generally not recommended for DIY installation. Due to their size, weight, and electrical demands, professional installation is almost always necessary to ensure safety and compliance with building codes.
Comparison Table of Common Ceiling Fan Features for DIYers
When selecting a ceiling fan, DIYers should consider factors that directly impact installation complexity and safety. Here’s a comparison focused on aspects critical for a successful DIY project:
| Feature | Ceiling Fan with Light | Ceiling Fan without Light | Decorative Fan |
|---|---|---|---|
| Wiring | More complex | Simpler | Variable |
| Weight | Moderate to Heavy | Light to Moderate | Moderate to Very Heavy |
| Mounting | Requires strong support | Standard fan support | Requires strong support |
| Assembly | Moderate to complex | Simple to moderate | Moderate to complex |
| Cost | Higher | Lower | Variable, often higher |
| DIY Suitability | Moderate | High | Moderate |
- Key takeaway for DIYers: Fans with more features or heavier designs will demand more attention to structural support and electrical connections. A simpler fan without a light is often the easiest entry point for a DIY installation.
Guide to Choosing the Right Ceiling Fan: Preventing Mistakes Before They Happen
The journey to a perfectly installed ceiling fan begins long before you pick up a screwdriver. Making informed choices during the selection process can prevent numerous installation headaches.
Determining Usage Needs: Room Size and Purpose
One of the most frequent errors is selecting a fan that is either too small or too large for the room. A fan that is too small won’t effectively circulate air, leaving you still warm, while an oversized fan can create uncomfortable turbulence.
Selecting Appropriate Fan Size: A Critical Step
Measure your room’s dimensions carefully to choose the right blade span.
- Rooms up to 75 sq. ft.: 29–36 inch fan
- 76–144 sq. ft.: 36–42 inch fan
- 144–225 sq. ft.: 44 inch fan
- 225–400 sq. ft.: 50–54 inch fan
- Over 400 sq. ft.: 60 inches or larger, or multiple fans
For rooms with non-standard shapes or high ceilings, consider consulting a fan size guide or a professional to ensure optimal airflow and efficiency.
Choosing a Fan Motor: AC vs. DC
Ceiling fans typically come with either an AC (alternating current) or DC (direct current) motor.
- AC Motors: More traditional, generally less expensive, but consume more energy and can be noisier. Wiring is usually straightforward.
- DC Motors: Newer, highly energy-efficient, quieter, and often come with advanced features like multiple speeds and remote control. However, they require a driver and specific wiring, and a common mistake is attempting to wire a DC fan directly to AC power, which can severely damage the motor. Always verify the fan’s power requirements.
Selecting Blade Material: Weight and Aesthetics
Blade materials include wood, plastic, metal, and composite. The material choice impacts aesthetics, durability, and, importantly, the fan’s overall weight. Heavier blades or a heavier fan body will necessitate stronger structural support in the ceiling, a critical consideration for DIY safety.
Important Features to Consider: Beyond the Basics
Modern ceiling fans offer a range of features that can enhance convenience but might add complexity to installation:
- Remote Control/Wall Control: Requires specific wiring for the receiver unit.
- Timer Functions: Often integrated with remote controls.
- Reversible Blades: A switch on the fan housing or remote allows changing blade direction for summer (downward airflow) and winter (upward airflow to recirculate warm air). Ensure the switch is accessible after installation.
- Smart Home Integration: Wi-Fi enabled fans connect to smart home systems, requiring network setup in addition to physical installation.
Top Mistakes DIYers Make When Installing Ceiling Fans
Even with the right fan, the installation process can go wrong if crucial steps are overlooked. Here are the most common DIY mistakes to avoid:
1. Using the Wrong Electrical Box
This is arguably the most dangerous mistake. A standard light fixture box is designed to hold only the weight of a light. Ceiling fans, with their motor and blades, are significantly heavier and generate movement and vibration.
“A basic electrical box isn’t designed to handle that kind of load. Using one can result in mounting failure, motor strain, or even a ceiling collapse.” – Dan’s Fan City
What to do: Always use a UL-listed, fan-rated electrical box that is clearly marked “suitable for ceiling fan support.” These boxes are specifically designed to support the dynamic load and weight of a ceiling fan. For retrofit installations, use a brace kit that anchors firmly between ceiling joists.
2. Ignoring Manufacturer’s Instructions
Many DIYers skim or disregard the instruction manual, assuming all ceiling fan installations are the same.
What to do: Every fan model has specific assembly, wiring, and mounting guidelines. Read the entire installation guide before you begin. Follow brand-specific wiring diagrams carefully and never mix parts from other fan models.
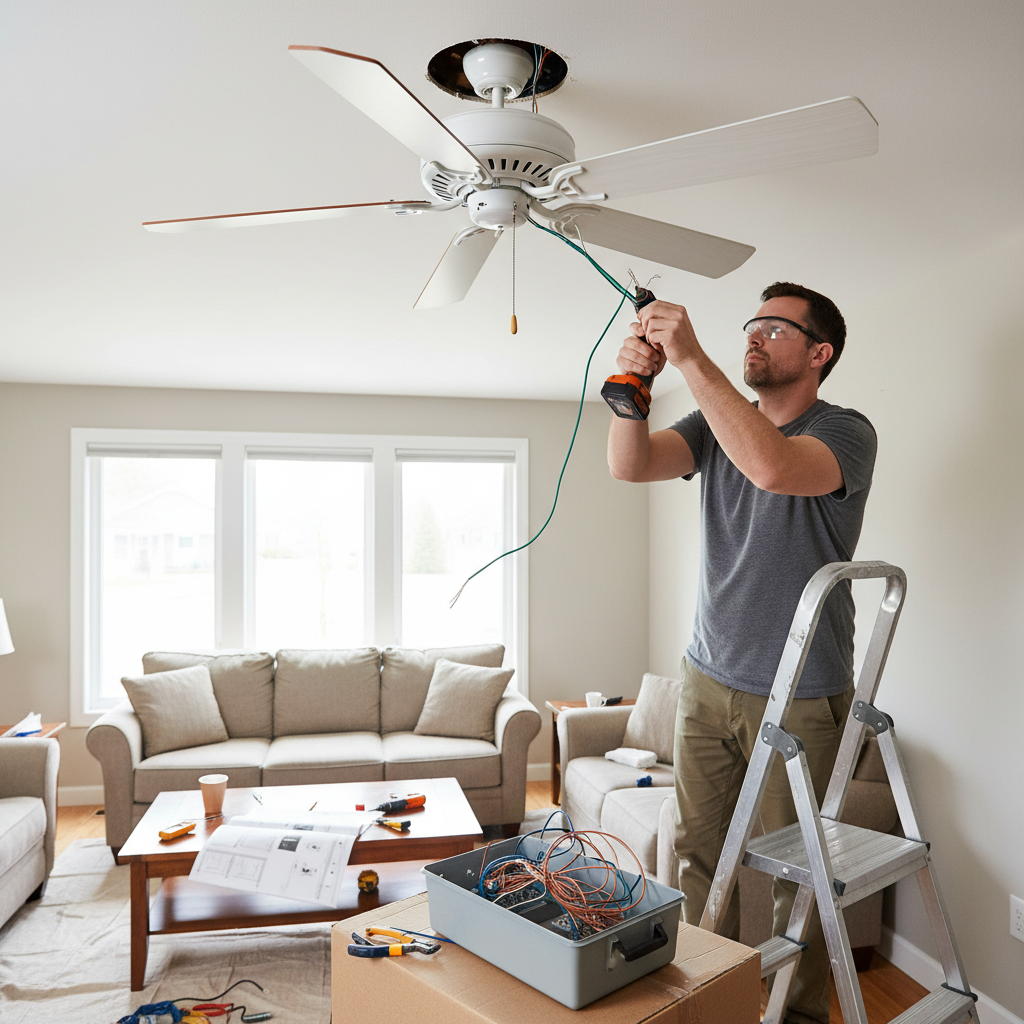
3. Improper Electrical Connections and Wiring
Incorrect wiring is a major safety hazard, potentially leading to flickering lights, malfunctioning controls, or even electrical fires.
- Not turning off power: Always, always turn off the power at the circuit breaker for the specific room or the main breaker before touching any electrical wires.
- Not testing for inactive wires: Use a voltage tester to confirm that the wires are truly dead before proceeding.
- Improper grounding: Grounding is an essential safety step that helps prevent electrical faults and reduces the risk of shock. Ensure your fan is properly grounded according to instructions and local codes.
- Mismatched wiring: As mentioned, trying to wire a DC motor fan directly to an AC power source is a critical mistake that will damage the fan.
4. Incorrect Mounting Height and Inadequate Support
Mounting the fan at the wrong height or without proper structural support compromises both performance and safety.
- Height: Fan blades should be at least 7 feet above the floor for safety and optimal air circulation. For higher ceilings (8-9 feet or more), use a downrod to position the fan effectively. For low ceilings, choose a flush-mount (hugger) fan.
- Support: Ensure the fan-rated box is either mounted directly to a ceiling joist or supported by a brace bar between joists. Ignoring the ceiling structure’s stability can lead to the fan falling.
5. Skipping Pre-Installation Inspection
Before starting, many DIYers jump straight into disassembly without a thorough inspection.
What to do: Check the existing ceiling structure for stability, confirm proper electrical wiring, and ensure adequate support for the fan’s weight. Neglecting this can lead to serious safety hazards down the line.
6. Poor Blade Alignment or Balancing
An unbalanced fan can wobble, make excessive noise, and lead to premature wear and tear on the motor.
What to do: After assembly, ensure all blades are at the same distance from the ceiling and that all screws are tight. Most fans come with a balancing kit, including weights, to correct any wobble. Follow the kit’s instructions carefully to achieve smooth, quiet operation.
7. Incorrect Fan Size for the Room
As discussed in the selection section, a fan that is too small won’t cool effectively, while one too large can create uncomfortable drafts and turbulence. This leads to dissatisfaction and potentially the need for re-installation.
8. Improper Fan Assembly Before Hanging
Attempting to hang the fan before all components are correctly assembled can make the process unnecessarily difficult and lead to mistakes.
What to do: Assemble as much of the fan as possible on the ground, following the manual’s step-by-step instructions, before lifting it to the ceiling. This reduces the risk of dropping parts or incorrect connections in an awkward position.
Guide to Safe Installation and Maintenance
Avoiding mistakes isn’t just about what not to do; it’s also about adopting best practices for safe installation and ongoing care.
Key Installation Safety Steps
- Safety First: Always turn off power at the circuit breaker and verify with a voltage tester.
- Read the Manual: Thoroughly understand your specific fan’s instructions.
- Use the Right Box: Install a UL-listed, fan-rated electrical box securely anchored to a ceiling joist or brace.
- Proper Wiring: Follow the wiring diagram exactly. Ensure all connections are secure, and the fan is correctly grounded.
- Secure Mounting: Double-check that all mounting brackets and screws are tightened according to specifications.
- Balance Blades: Use the included balancing kit to eliminate wobble and noise after installation.
How to Maintain Your Ceiling Fan for Longevity
Once installed, a ceiling fan requires minimal but consistent maintenance:
- Regular Cleaning: Dust can accumulate on blades, causing imbalance and reducing efficiency. Clean the blades regularly.
- Check for Loose Screws: Periodically inspect all screws, particularly those on the blade arms and mounting bracket, and tighten them as needed.
- Listen for Unusual Noises: Rattling or humming can indicate a developing issue. Address it promptly.
Troubleshooting Common Post-Installation Issues
- Wobbling: Often resolved with a balancing kit or by tightening screws.
- No Power: Check circuit breaker, wall switch, and fan’s pull chain or remote battery. Re-check wiring if necessary (after turning off power).
- Noise (Humming/Clicking): Can be due to loose screws, motor issues, or electrical interference.
Conclusion
Installing a ceiling fan can be a rewarding DIY project that significantly enhances your home’s comfort and energy efficiency. However, success hinges on meticulous planning, adherence to safety protocols, and a keen eye for detail. By avoiding common pitfalls such as using an unsuitable electrical box, neglecting manufacturer instructions, or overlooking critical electrical and structural checks, you can ensure your ceiling fan operates safely, quietly, and effectively for years to come. Remember, when in doubt about any step, especially those involving electrical work or structural integrity, consulting or hiring a licensed electrician is always the safest and smartest decision.
Are you ready to tackle your ceiling fan installation with newfound confidence and knowledge?
Frequently Asked Questions
Can you hang a ceiling fan without a fan-rated electrical box?
No, it is highly unsafe to hang a ceiling fan without a UL-listed, fan-rated electrical box. Standard light fixture boxes are not designed to support the heavier weight and dynamic movement of a ceiling fan, which can lead to the fan loosening or falling.
Can I install a ceiling fan where a light fixture used to be?
Yes, you can, but only if the existing electrical box is fan-rated and securely mounted to a joist or brace. If it’s a standard light fixture box, it must be replaced with a fan-rated box to ensure safety and proper support.
Why is my ceiling fan shaking or wobbling?
A shaking or wobbling ceiling fan is typically due to unbalanced blades, loose blade screws, or an unsecure mounting. Use a blade balancing kit (often included with the fan) and ensure all blade screws and the mounting bracket are tight.
Do ceiling fans need to be grounded?
Yes, absolutely. Grounding your ceiling fan is a crucial safety measure that helps prevent electrical faults and significantly reduces the risk of electrical shock. Ensure proper grounding as specified in the manufacturer’s instructions and local electrical codes.
What is the correct height to mount a ceiling fan for optimal performance and safety?
For optimal performance and safety, fan blades should be at least 7 feet above the floor. For rooms with higher ceilings (8-9 feet), using a downrod can bring the fan to a more effective height for air circulation. For low ceilings, a flush-mount fan is recommended.
Should I hire an electrician to install a ceiling fan?
While many ceiling fans can be DIY-installed, it is strongly recommended to hire a licensed electrician if the installation involves new wiring, mounting into plaster, very high ceilings, or if you are not confident in your electrical skills. Safety should always be the top priority.